Monday 14 August 2017

Dynamics GP Workflow Setup Steps - Dynamics GP 2016

Dynamics GP Workflow Setup Steps
Go to Tools –> Setup –> Company –> Workflow –> Workflow Calendar following form will appear
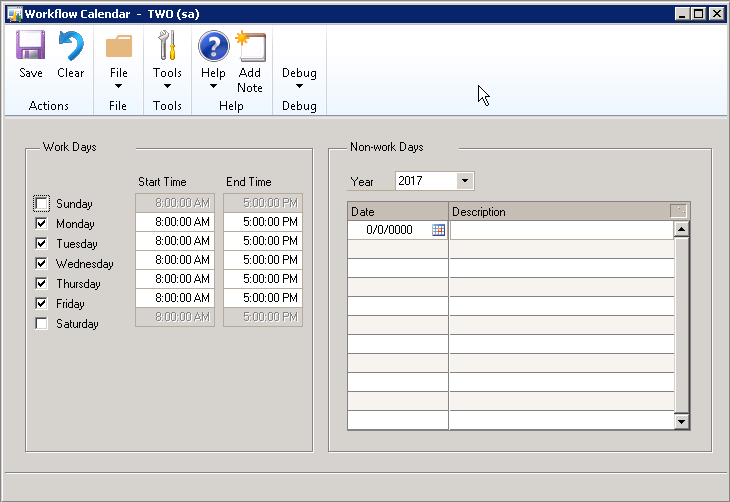
Here we need to define Work Days and Non-work Days


Go to Tools –> Setup –> Company –> Workflow –> Workflow Maintenance following form will appear
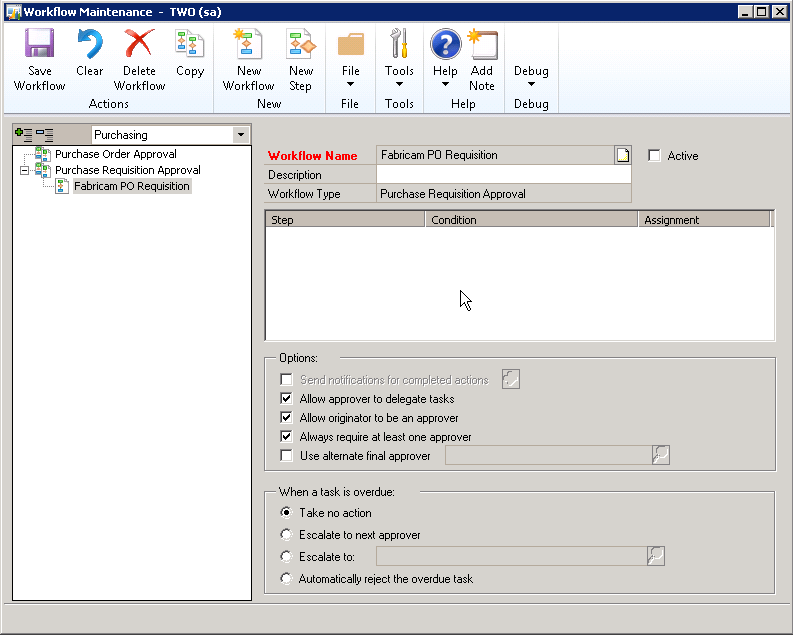
This is the form in which we define the type of workflow and steps involved in workflow
We need to mark this workflow to be Active
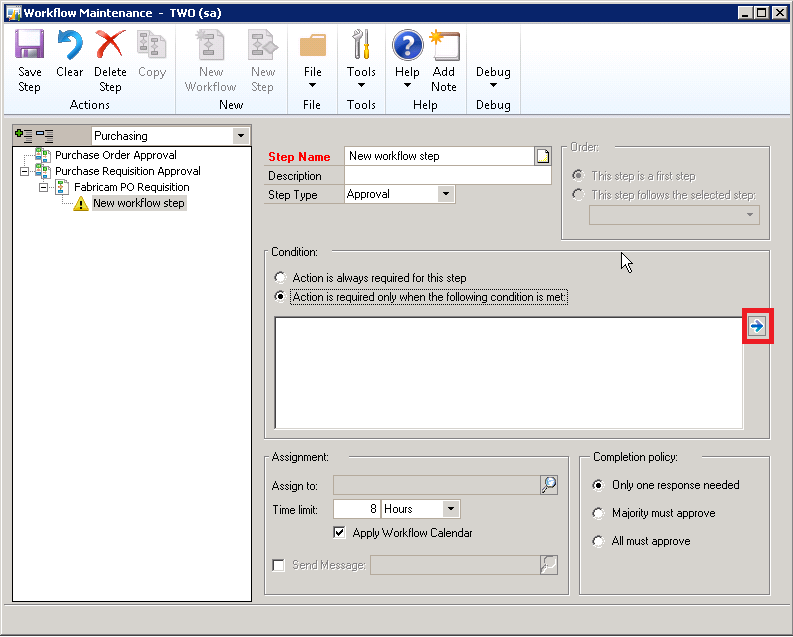
After saving this information only New Step option will be available, after clicking New Step following form will appear
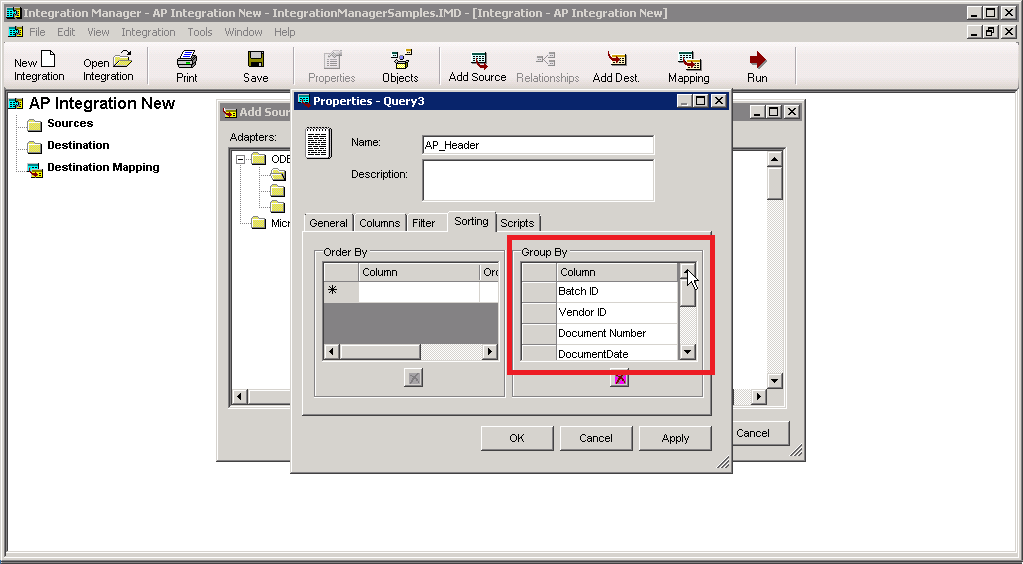
Here we need to select Step Type and Condition Type
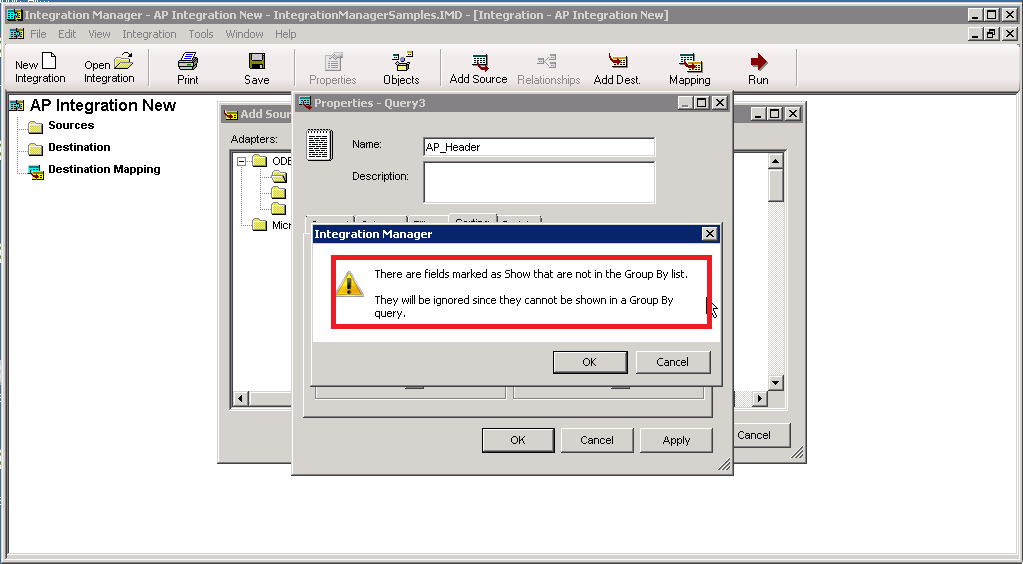
If we select ConditionAction is always required for this step no need to define any condition but if we select 2nd option click the arrow button highlighted as shown below
Here we can user Assign to User only from (Domain users and not the GP users)
Click on this arrow button following form will appear
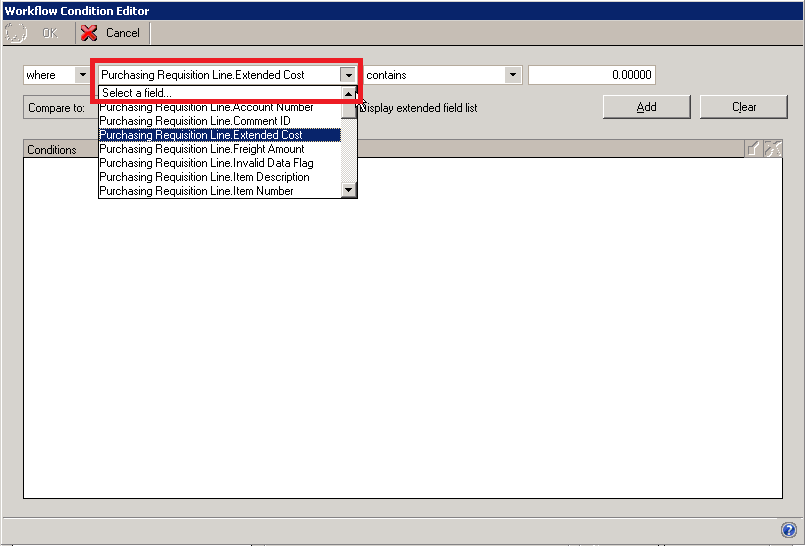
Select the operator as shown below

Click Add
Click OK
Save this step
We can add multiple Steps as we need.
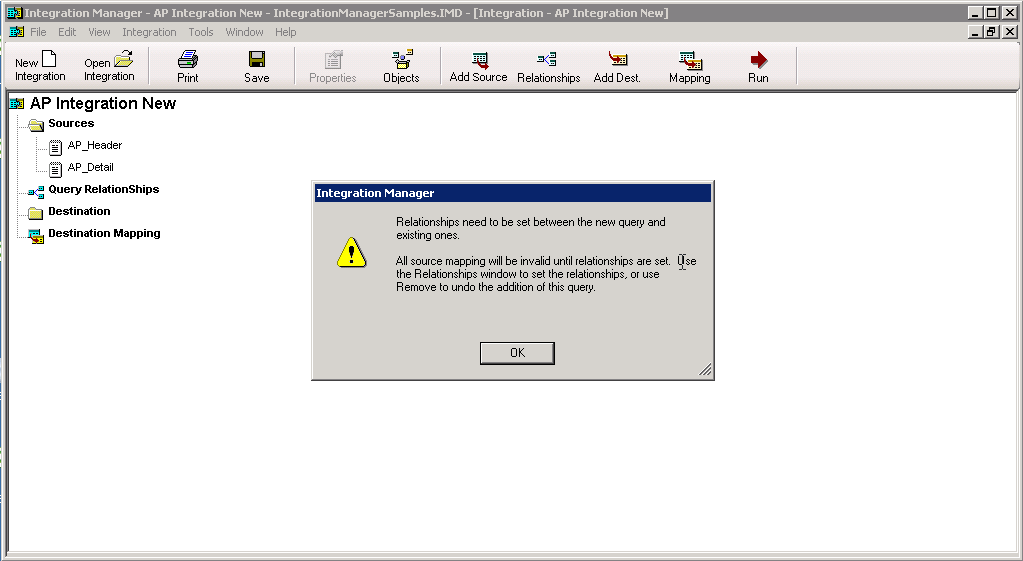
We need to activate this workflow, then only workflow functionality will start.

After enabling workflow functionality user can not transfer PO requisition to Purchase Order with required approval at various levels.

Using Integration Manager to integrate AP transactions in Dynamics GP - Dynamics GP 2016

Using Integration Manager to integrate AP transactions in Dynamics GP


Before starting Integration manager we need to created a source file prefereably CSV of Tab delimited (with valid data) to integrate the same in Dynamics GP as per attached Excel file.


Start Integration Manager by Start –> Programs –> Microsoft Dynamics –> Integration Manager12 –>  Integration Manager as shown below
It will appear as shown below


Click on New Integration
Here we need to enter Integration name (which I have entered as AP Integration New) click OK
Click on Add Source button appearing in main toolbar of Integration Manager following form will appear
Select ODBC/Text -> Text and double click on Define New Text following form will appear
Enter Name, Select Source File and tick on First Row Contains Column Names. Click on Columns tab make sure that column heading appearing in column names, click on Sorting tab as shown below select the fields required for header information (i.e. Batch ID, Vendor ID, Transaction Date, Description, Document Number, Docment Date, Document Amount) as shown below
Click OK, you will get following warning
Click OK
Add another source by clicking Add Source Button and select the same source file to add source with name as AP_Details and select all columns and click OK following message will appear
Click on Relationship button and set relationship as shown below
Close this window
Click Add Destination following form will appear
Click on Payables Management and double click on Payables Transactions
Click Mappings button on toolbar following form will appear
Map the respective source field to destination
Click on Distribution and map the source fileds in destination from AP_Detail source as shown below
Click on Highlighted button following form will appear, select fields from AP_Detail source
Click Select the map the destination fields related to AP_Details as shown below
For Debit Amount select Use Positive Source Field, similarly for Credit Amount Select Use Negative Source Field
You can Run this integration only if your Integration manager is registered. You can register Integration Manager by Tools -> Registration

Start Dynamics GP and select the company in which you want to integrate data from source file, and run integration by click Run button on toolbar.

Tuesday 4 April 2017

Adobe PDF Converter error when sending report to PDF in Microsoft Dynamics GP

Adobe PDF Converter error when sending report to PDF in Microsoft Dynamics GP

  1. Click on start menu you will see the below screen, click on Control panel to open the control panel.

  1. You will see the below control panel screen, in the hardware section click on “view devices and printers.”

  1. You will see the below screen, right click on the Adobe PDF and click on “printing preferences.”


  1. Unmark the check box “Rely on system fonts only; do not use document fonts” and click ok , then again click on ok.

Saturday 11 March 2017

An error occurred in the Microsoft .NET Framework while trying to load assembly id 65626. The server may be running out of resources, or the assembly may not be trusted with PERMISSION_SET = EXTERNAL_ACCESS or UNSAFE

Error while submitting workflow on GP 2016R2 -
An error occurred in the Microsoft .NET Framework while trying to load assembly id 65626. The server may be running out of resources, or the assembly may not be trusted with PERMISSION_SET = EXTERNAL_ACCESS or UNSAFE


We have installed and upgraded the GP from lower version to the upper version of the GP. We have restored the SQL server on the new installed SQL server. Once we upgraded the GP2010 to GP 2016R2 without any error and while testing the workflow it was giving an error. To solve this error you need to run the one store procedure against DYNAMICS Database and this error will be solved.
 EXEC DYNAMICS.dbo.wfDeployClrAssemblies

Execution of user code in the .Net Framework is disabled. Enable “clr enabled” configuration option

GP Error while email testing – GP 2016R2

Error – Execution of user code in the .Net Framework is disabled. Enable “clr enabled” configuration option.


The above error is related to the SQL server, the clr enabled is not enable. For this need to enable the clr on SQL server. Use the below query to enable to clr .

USE master;
GO
EXEC sp_configure 'show advanced option', '1';
GO
RECONFIGURE;
GO
EXEC sp_configure 'CLR Enabled', 1;
GO
RECONFIGURE;
GO
EXEC sp_configure 'show advanced option', '0';
GO
RECONFIGURE;
GO


Sunday 5 March 2017

GP Web Client Installation - GP 2016 R2


Web client runtime components installation –
  1. Go to the setup file folder and double click on the setup or right click on click open on the setup.
  2. Click on install – Microsoft Dynamics GP.
  3. Select the instance name and click next.
  1. Click on add/remove features.
  1. Select web client runtime and click next.
  1. Click on install and the installation process will start. Once the installation process is finished click on exit.

Creation of Security groups –
  1. Open Server Manager. Click Tool in the right corner of Server Manager and then select Computer Management.
  2. In the Computer Management windows, expand Local Users and Groups and select Groups. Right click on it and click on New Group.

  1. Enter the Group name for Web client users.
  1. Create new group for the web client admins using the same steps as users.
  1. After you create two groups you will see the both groups on the groups on Local Users and Groups section.
Internet Information Services (IIS) and ASP.NET -
Internet Information Services (IIS) and ASP.NET Internet Information Services (IIS) and ASP.NET must be installed on the web server on which you will be installing the Microsoft Dynamics GP web client.
  1. Open Server Manager. Click Manage in the right corner of Server Manager and then select Add roles and features.

  1. Click on next once you see the below page.
  1. Choose Role-based or feature-based installation, and then click next.
  1. Select your server from the server pool, and then click Next.
  1. Mark Web Server (IIS) and then click Next.
  1. Click on Add features.
  1. Select the features to install. Select ASP.NET 4.5 In the WCF Services group under .NET Framework 4.5 Features, select HTTP Activation.

  1. The screen for the Web Server Role (IIS) is displayed. Click Next.
  1. Select the role services to install for the web server.

In Common HTTP Features:
• Static Content
• Default Document

In Security:
• Windows Authentication

In Application Development:
• ASP.NET 4.5

Other role services will already be marked. Some are marked by default. Click Next.
  1. Click Install. The roles, features, and role services will be added.
  1. Once the installation is finished click on close.

Creation of security certificates –
  1. Open Internet Information Services (IIS) Manager.
  2. In the left pane, select the computer name.
  3. In the IIS group, open Server Certificates.
  1. Click on Create self-Signed Certificate from the right side.
  1. Specify the certificate name and click on ok, new self-signed certificate will be created.

  1. In the left pane, expand the Sites group. Within the Sites group, select the site that you are configuring to use SSL. For example, select the Default Web Site.
  2. In the Actions pane, click Bindings.
  3. In the Site Binding window, click Add.
  4. In the Add Site Bindings window, select https for the type, and then choose an SSL certificate that you created and click on ok.


  1. Click on close.


Web client installation –
  1. Go to the setup file folder and double click on the setup or right click on click open on the setup.
  2. Click on web client from Additional products.
  1. Accept the License Agreement.
  1. Click on custom.
  1. Select the features that you want to install. On the web server machine, you will typically install the Web Server, Session Central, Web Site, and the Web Management Console and click on next.
  1. Enter the SQL server instance name and keep the database name as default.
Specify the SQL server credentials.
  1. Select the authentication type as windows account and click on next.

  1. Select the web client users group and the web client management  console users, which we have created earlier.
  1. Click on next.
  1. Enter the sa user id and password and specify the Dex.ini and dynamics.set path. Keep default if you have not specified any path.
  1. Re-enter the sa password again.
  1. Select the certificate which we have created earlier and enter the domain user is and password.
  1. Select the website name and enter the domain credentials and click next.
  1. Click on next.
  1. Select the website name and enter the domain credentials and click next.

  1. Select the certificate which we have created earlier and enter the domain user is and password and click next.

  1. Select the certificate which we have created earlier and click next.
  1. Select the certificate which we have created earlier and enter the domain user is and password.

  1. Select the certificate which we have created earlier and enter the domain user is and password.


  1. Click on install and the installation process will start.
  1. At the Welcome screen, click next.
  2. Specify the type of authentication you want to use to connect to the SQL Server where the database for the Session Central Service database is located. Click Next to continue.
  3. Review the configuration actions that will be performed. Click Next to continue.
  4. Click Exit.
  5. Restart the Session Central Service for the Microsoft Dynamics GP web client installation. You must do this on the machine where you installed the SessionCentral Service, typically the machine that is hosting the web site. This step is necessary to allow the Session Central Service to establish communication with the session host machine.